When unique requirements come up inside our projects we often have to fall back onto some simple rule hack techniques to make sure our automation rules hit all the right notes for our customers’ processes.
Working with online sellers and eCommerce systems for an extended period gives you an insight into how their rules work and we want to share a couple of interesting hacks you might implement.
As with many of our tutorial guides, our chosen eCommerce system for all examples will be Linnworks Order Management alongside their Automation rules.
What are Shipping Automation rules?
Shipping automation rules are a workflow-based visual interface for creating conditions and actions inside of a rule engine.
When an order is downloaded from one of your selling channels to the system, it’s run through these conditions and exclusions using the different limits and checks put in place to assign one of your chosen couriers shipping services automatically.
You create a series of if/and/or checks that push an order down a certain part of your workflow logic to end with one of your chosen actions.
Whether that is assigning services to orders, sending them to different warehouse order locations within the system or pushing orders that need to be isolated into various user-created folders.
Why bother with Automation rules?
Customers often have wildly different needs and conditions for their orders based on differing criteria. From UK-specific to Rest of world orders, to using properties on items to decipher how an order should be handled in the system.
An automated shipping rules engine inside of your eCommerce system is a powerful way to reduce time spent allocating services every single day. With a set of core shipping services being applied to orders you will free up your teams on the ground and improve the time it takes you to print and pack shipments.
By taking the time to set up different conditions and actions for your eCommerce system you benefit from:
- Improved picking and packing times
- Free up key staff members
- Save money by using accurate shipping services to send orders
- Fewer issues with parcels being assigned the wrong service and erroring in printing
- Helps to eliminate human errors
Anatomy of a shipping rule
Please note:
- Linnworks is being used as an example. The shipping rules logic applies to online sellers in general and not to a specific eCommerce automation tool.
- The shipping rules logic is an example of a general ruleset to direct you and help you getting started.
- Parcel size conditions example covered in the video is one of the methods on how to establish a correct order’s parcel size. More methods are covered below in this article.
So what conditions and actions make up an optimised shipping rule? This can be easy to explain as it is primarily made up of 5 main key variables or conditions. They may, of course, be more complex but these are the bare minimum required.
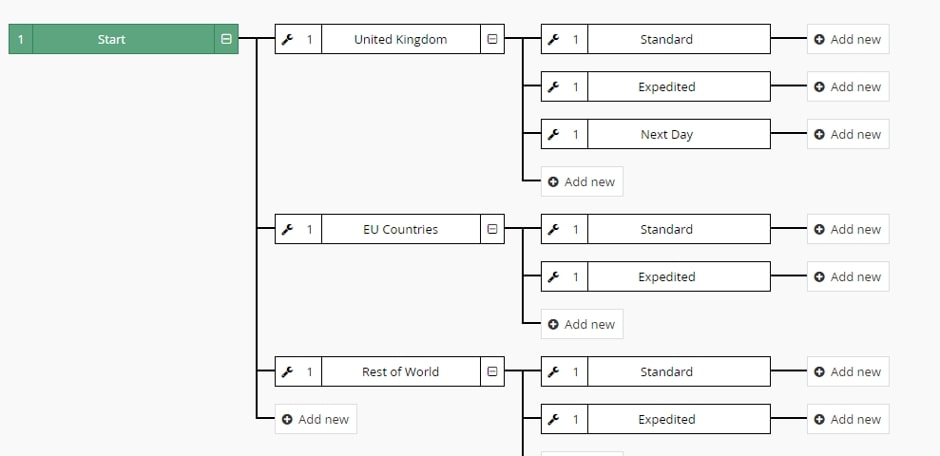
Destination
This is the order countries split you wish to introduce. Selling into the UK and abroad? Create two zones, one for domestic UK orders and one for the international orders you receive.
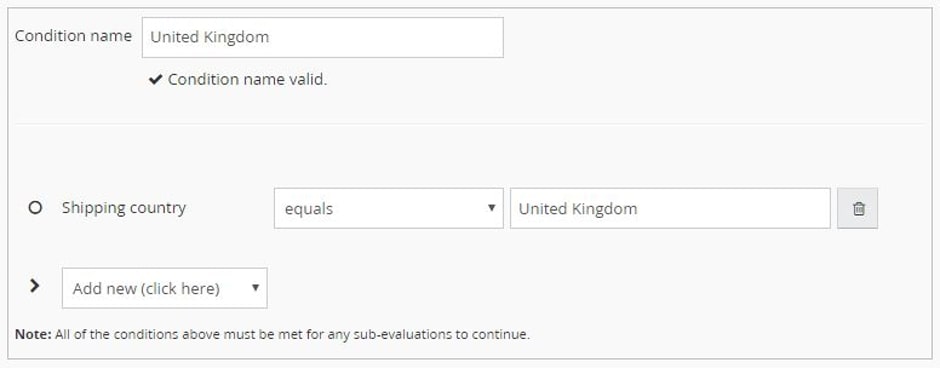
Selling into the EU as well? Create an EU zone that checks for matches on specific countries within the EU and adjust your ROW conditions to only accept orders that “do not match” either the United Kingdom or your chosen EU Countries. EU zones are helpful as oftentimes there are cheaper service costs attached to these countries closer to home.

Your rest of world zone will be set up to check for the reverse, all orders that don’t match the above two rules and will go down separate logic for further abroad and harder to reach international destinations that aren’t part of the EU.

Starting with countries as one of the first key conditions works great as an initial check to split international and domestic orders down different paths, ensuring the end services are eligible to reach each destination.
Using this as part of your rules engine setup stops you applying a domestic service to an overseas order or overcharging yourselves sending them on ill-fitted services.
Shipping service selected on a channel by a buyer
Once you have established the country based location of the order, the next key condition is the shipping service selected by the buyer on a selling channel. Often on marketplaces, sellers offer multiple speeds of service for both domestic and international orders.
This is downloaded as part of an order, picked up by the eCommerce system and read by the rules engine to associate an incoming service selected by a buyer to our own “terms” that we create to use as another splitting check to further filter orders.
A typical service set up on a channel could include:
- Standard. 3-5 day standard or second class services
- Expedited. 1-2 day services for domestic, tracked and signed for internationals
- Next Day. One day specialised, domestic services usually requiring an extra shipping cost from the customer
Create these as postal services internally to match these terms to the incoming selections from your customers.
To create a blank shipping service to use as a term, head to Shipping > Postal Services > click “Add Service” and give it one of your chosen term names. Now clicking “Add” to complete the service or “Add+1” will create multiple services from the same popup window.

Once created, navigate to Settings > Channel integration and click on the “Channel shipping” icon for the marketplace you want to associate the rules terms to.
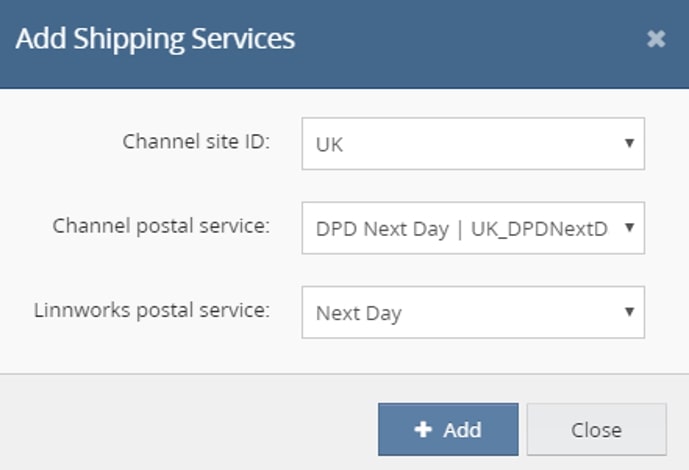
In this screen select the services you have available on your store as “channel postal services” such as “DPD Next Day” and associate them to the terms we have created on the “Linnworks Service” dropdown such as our service term for “Next Day”.
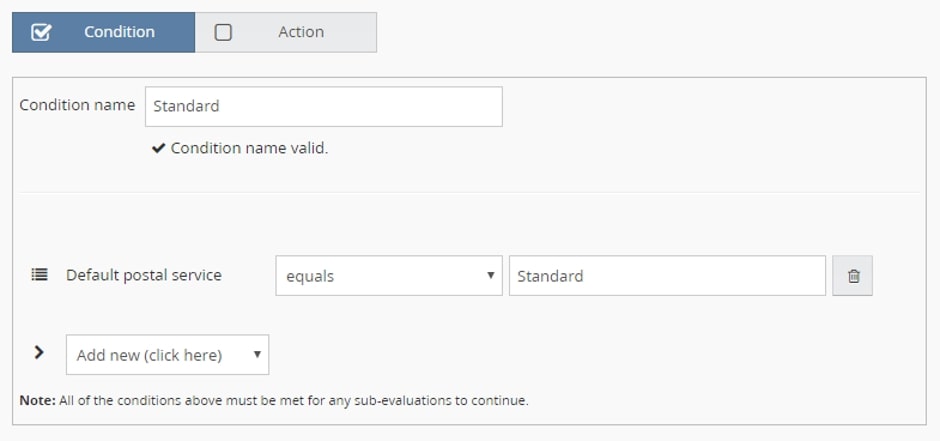
Once we have associated all of our channels to our specific terms we have created, we can now create conditions in our rule system to filter these orders down the correct path. First, we create the condition for each of our terms, in this example, Standard, Expedited and Next Day.
Now when orders are downloaded by the system, the channel will associate that term to that specific channel postal service.
This way we split up the different orders in the rules based on what the customer has purchased and ensured we land on a service that uses services with the correct timings to make sure our customer service ends with all smiles.
Price
Now that we have identified the requested speed, we identify the exact service on our end we should send the order by that matches up with the service speed they requested when completing the purchase.
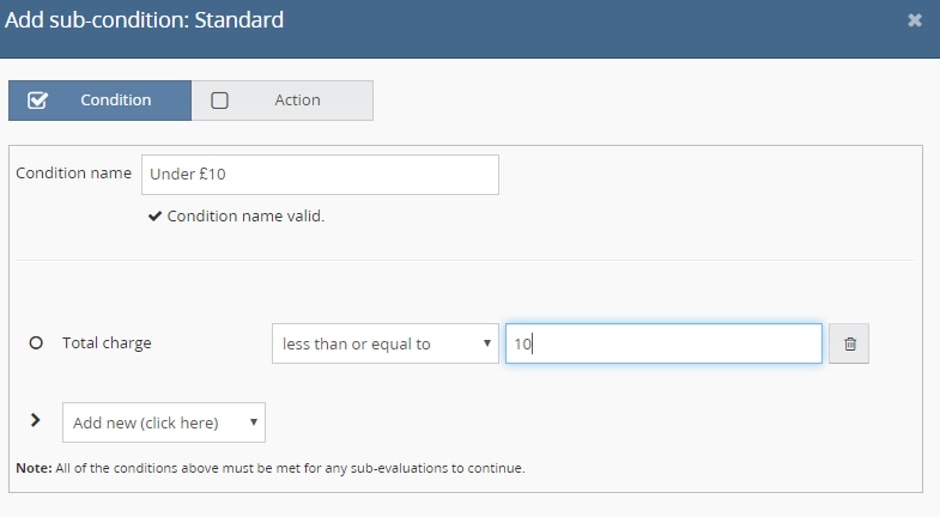
This condition can be used to see if your customers order warrants an upgrade in the service from regular orders to a tracked or signed consignment. It also helps you to establish at what point you offer these upgrades.
Remember to keep in mind when you create an IF condition, for example, if an order is less than £10, you need to introduce additional conditions on the same level for other orders that hit the system that won’t be under £10.
Perhaps there is a different set of 24-hour services for between £10 to £40 and a tracked and signed end services for items that are over £40.
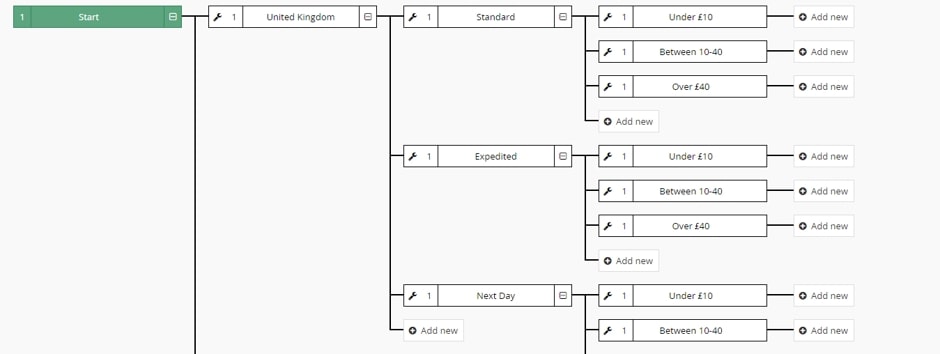
By introducing checks for under, between and over, we make sure no order slips through the rules without a proper price check which should then help us select more cost-effective or time-sensitive services.
Weight
In creating weight checks, we ensure that our services are not penalised by our couriers for being overweight, having issues with getting overcharged or parcels being rejected because the consignments were too large for the selected services.
This is why we introduce weight checks, to filter orders further so that we cannot misassign any order to services it is too large for.
To add weights to an item, navigate to “My inventory” and click on the blue SKU for the item you want to edit, click the tab named “Postage definition” and enter in the weight for your chosen weight measurement.

Back in your ruleset you then create weight checks for the different weight bands of services your couriers provide.
For example:
- Under 750g
- Between 750.01g and 2kg
- Between 2.001kg and 5kg
- Between 5.001kg and 30kg
- Over 30kg
This creates a full scenario for your orders to run through, no matter how heavy the order is one of these weight checks must allow it to continue to an end service.
Setting up an over 30kg check in this example is important as this is our maximum limit for couriers we have integrated.
Anything over 30kg can end on a “manual review folder” action for us to isolate it and decide manually how we will split the order to send by a cost-effective service.
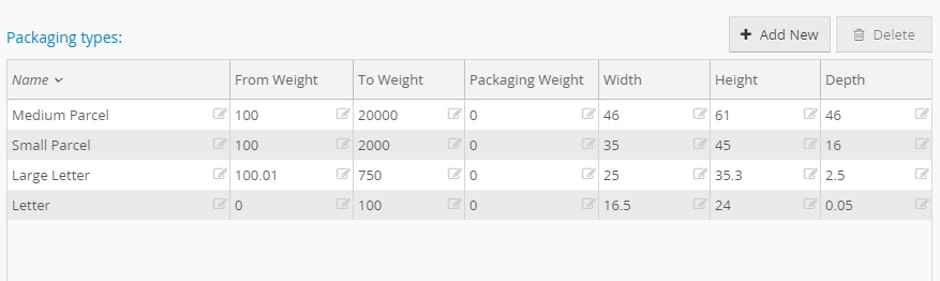
Packaging size assignment
One way to determine parcel size is by the Packaging group assignment method. This involves creating a set of different “packaging type” sizes with “from” and “to” weights, assigning them the names of the various parcel sizes used.
For example:
- Letter
- Large Letter (LL)
- Parcel
- Medium Parcel
Each of these then has weight to and from limits assigned to it and will be placed on orders when analysed by the system to ensure that a package can fit within that packaging group.
Using this method you select from 4 different calculation types:
- Weight only – The system checks the weight limits and calculates that against the weight of the order. It then chooses the smallest packaging type the order can fit into.
- Take maximum dimensions of order items – This takes the largest length, width and depth dimensions from each item and calculates them together to work out a parcel this order can fit into.
- Fit graphically – Here the system calculates the volume of each packaging type, both weight limits and dimensions runs it against the order volume taking weights into account before choosing a packaging type that the order fits into volumetrically.
- Stack items vertically – For special uses, you can command the system to calculate the sum of the order height along with the maximum width and depth from all order items using this to find the right packaging type to fit.
To append these checks to your rules, add a new condition for each parcel size using the “Packaging type” condition check, equaling the packaging types you have created. See the images below for the setup.
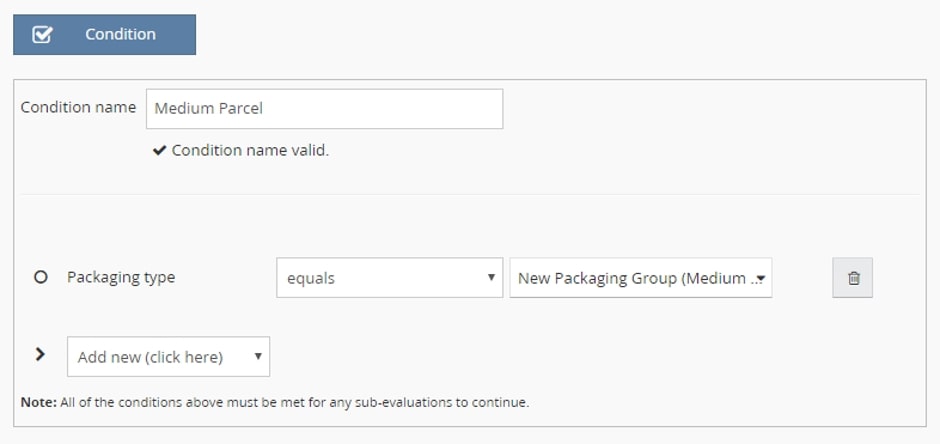
Create one condition for each type of packaging type. Order items that have weights and dimensions attached are calculated, have their packaging type assigned and are then sent down to the correct services based on the overall size of the parcel and what packaging type it uses.

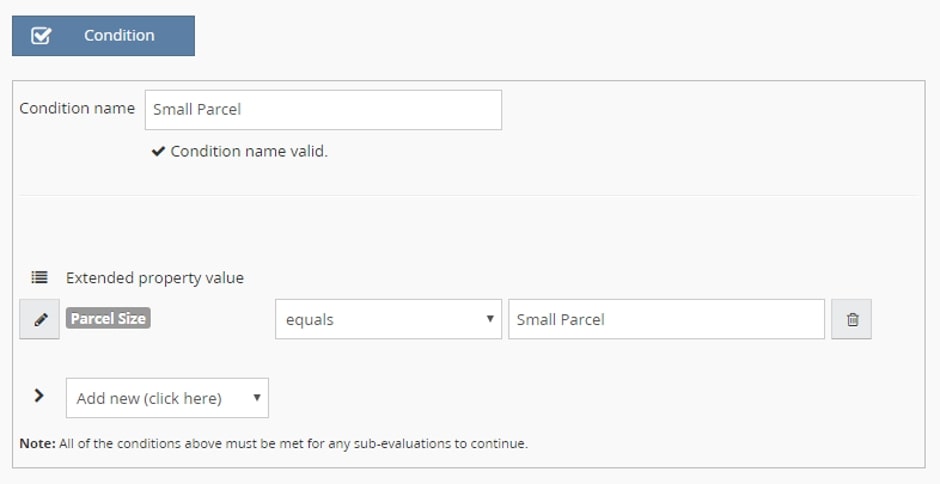
“Parcel Size” Property
If assigning exact dimensions is too large a task you can introduce property types on the item level to establish a package size. First, create an import sheet of all your SKU’s with an extended property column for “Parcel Size” with values matching the different parcel sizes you send orders out from.
In our case:
- Letter
- Large Letter (or LL)
- Parcel
- Medium Parcel
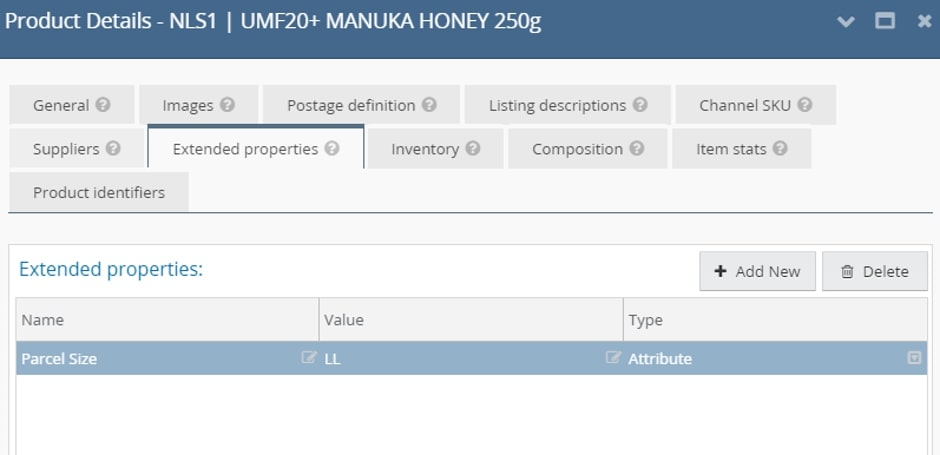
Once you append this property to every item, you can now use a rule condition connecting from your price checks to examine the property and push those items down the correct rules logic in your system.
To create a rule to check each one, start by making a condition with a check for “Extended property value” and create a condition that checks whether that equals one of your four values.
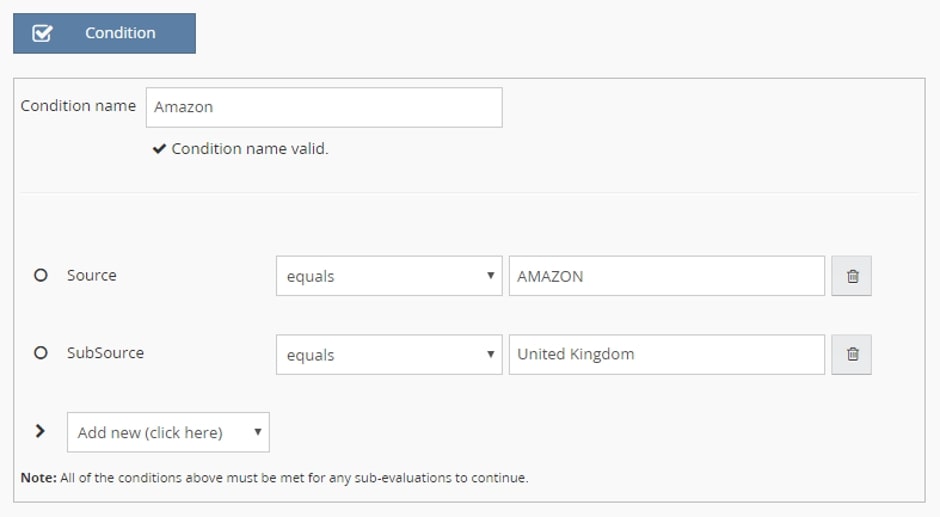
Amazon Prime Rules
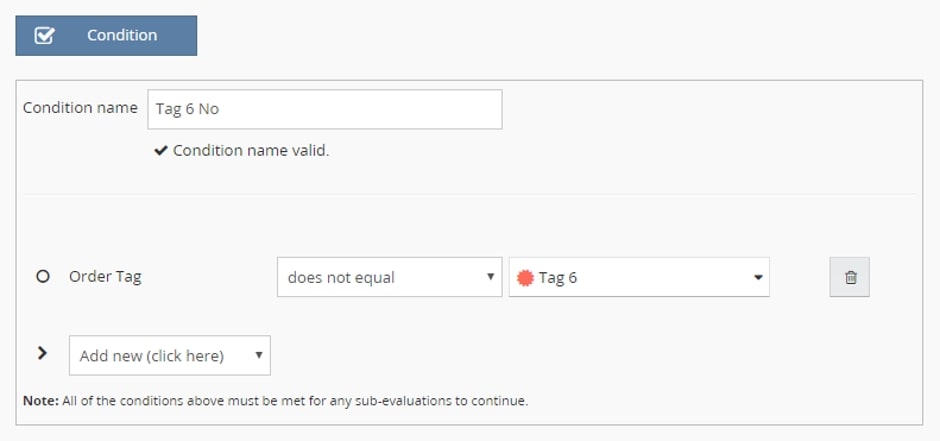
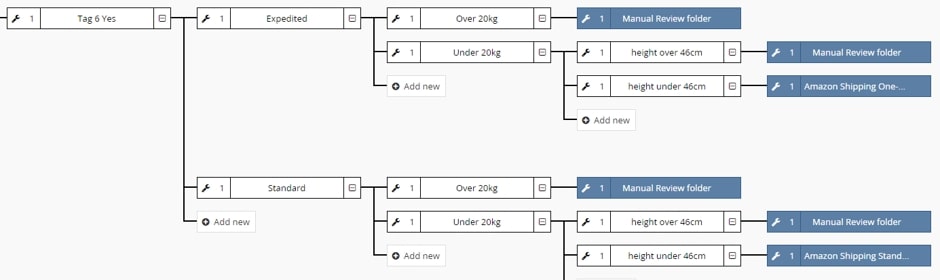
Creating a separate ruleset for Amazon Prime allows you to apply services to these crucial orders first before the rest of the orders are looked at. To help identify Prime orders in Linnworks, each one is appended with order tag 6, which is reserved for Amazon Prime orders.
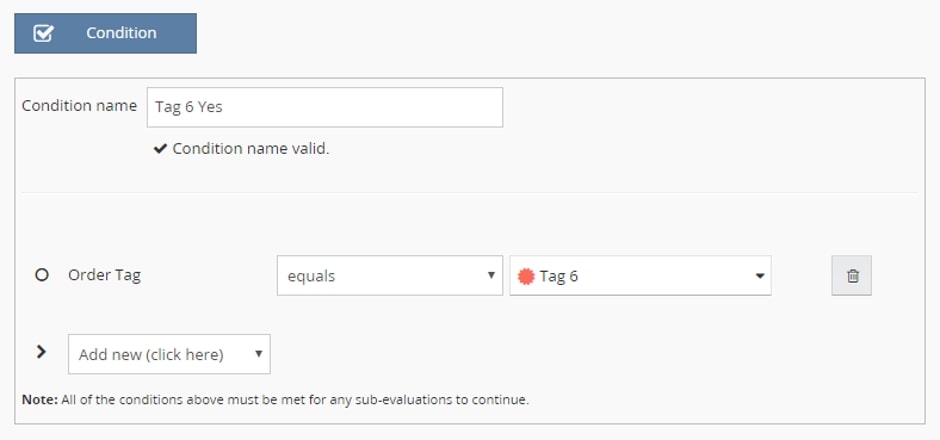
Creating a rule that uses the order tag equals tag 6, you can create an exclusive ruleset for prime orders. This means only orders containing the tag can ever enter down the logic path.
Now you can add the checks and conditions above to this prime ruleset and use the end actions for Amazon Prime Shipping Services or couriers that are approved by Amazon’s shipping requirements.
Back inside your non-prime rules, you can create the reverse check for tags on your main shipping rules essentially hard locking prime orders to the prime ruleset and standard orders through your main shipping rules ruleset. If you are using Amazon prime we recommend setting this condition as the first level check in your rules.
With this setup as your first check inside both rule sets, you can order the prime rules to run first.

Amazon Prime has up to three speeds available in the UK:
- UK Next (One Day Shipping)
- Second Day (1-2 day services such as Royal Mail 24 Tracked)
- Std UK_Dom 1
Setup the conditions with the different terms for the speed of service requested by the customer, weight limits, parcel size checks and enable your separate rules set for your prime orders only, this way you know all your prime customers are served services applicable to the Amazon SLAs.
FedEx Rules
FedEx orders abroad will require signatures to ensure that your parcels don’t go missing whilst you ship abroad to your customers.
To ensure all Fedex orders are automatically marked for a signature we can append a separate rule to our overall rules workflow mandating that if an order is from FedEx, that we assign an “extended order property” to this order. Adding a code that will be picked up when the order is sent to the courier.
This code will mandate that all of our FedEx parcels abroad are signed packages using the “SERVICE_DEFAULT” option and meaning we can track whether our order makes it to the intended recipient.
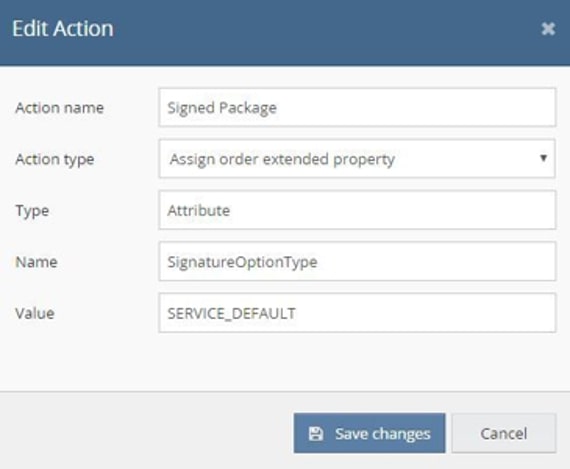
If you require a different type of signature for your orders you can refer to this list to see the range of signature options available and their explanations. The property type by default in Linnworks is SignatureOptionType and requires a value of the following.
- ADULT
- DIRECT
- INDIRECT
- NO_SIGNATURE_REQUIRED
- SERVICE_DEFAULT
Manual Review Folder
Creating a manual review folder and combining this with a shipping automation rule to cover any orders that may exceed your largest courier services ensures that should there be an eventuality an order can’t be assigned.
It automatically lands in a focussed view in your open orders for you to quickly assign services to any orders that fall outside of your initial parameters.
This makes your ruleset more robust and ensures you aren’t taking shortcuts to assign services to orders losing money in the process.
Isolating orders inside of your eCommerce system is one of the advantages to implementing rules as often services and offers to customers may require a more human approach to these one-off, multi-item orders that can crop up and throw an automated system for a loop.
If a manual review option isn’t implemented for those orders that exceed your expectations you may find yourself applying costly services to orders that may be rejected somewhere down the fulfillment line. Using a combination of automatic assignment for orders within limits and a staging area where a final, human check can be implemented really helps.
Additional Variables
There are several additional variables we see sellers take into account in different setups and situations, each of these is optional but can round your rules set to be more robust, accurate and drill down into specific seller scenarios that you may encounter.
Number of Items in an order
When sellers receive orders of multiple items, this may change the end services those orders require. By introducing specific item number conditions after a country check, each scenario is accounted for and your larger services that can fulfill these orders.
To set up specific item count conditions, use the conditional check Item count (no parents) and your chosen method for establishing parcel sizes. See an example below for large letter items, this logic path would use exclusively Large Letter courier services and ensures the end service chosen fits the order.
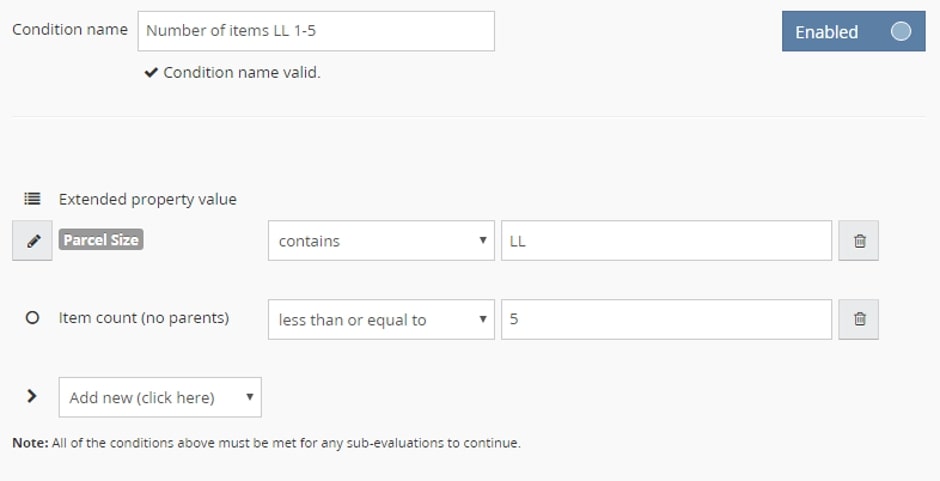
Setting up scenarios for a different amount of items makes sure that the size of orders is accounted for in each different scenario.
This also accounts for orders that may contain both a Large Letter item and Small Parcel Items, using this method you can create different conditional combinations of products each ending on end services that deliver parcels of that size.
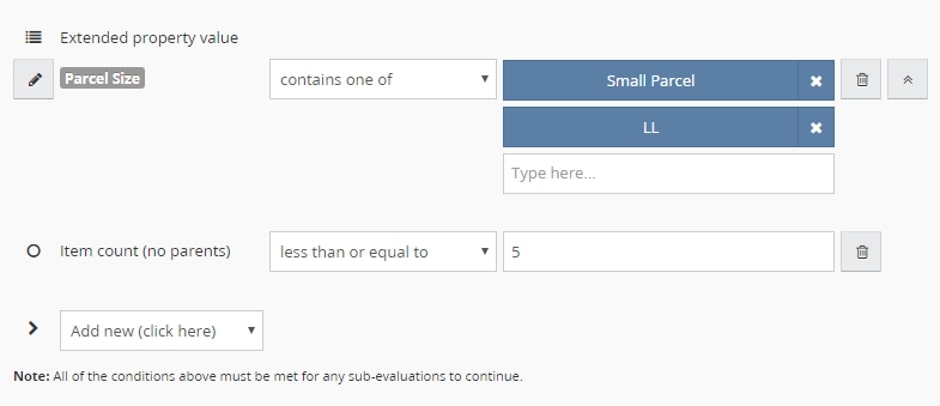
This check stops an order of several large letter items together being too large for the service when it comes to packing. By accounting for each scenario your accuracy greatly improves and means no order type catches you out during a busy packing period.
Selling channels, where orders come from
These conditions work as great first or second level checks to split orders and services up in your ruleset by the origin of the selling channel.
Creating a full list of each channel you sell on allows you carefully craft the end action services for each platform ensuring that you deal with parcels from a platform per platform basis and use services appropriate to each platforms differing requirements.
Postcode checks pass and fails
Using postcode checks on your domestic UK order logic helps ensure your end services coverage is taken into account before assigning a courier.
Using the postcode condition you can set the parameter to “starts with one of..” and input the first half of each restricted postcode your services will not be able to reach domestically.
This is particularly helpful with UK domestic deliveries to Northern Ireland, Scottish Highlands and Islands as well as UK offshore locations.
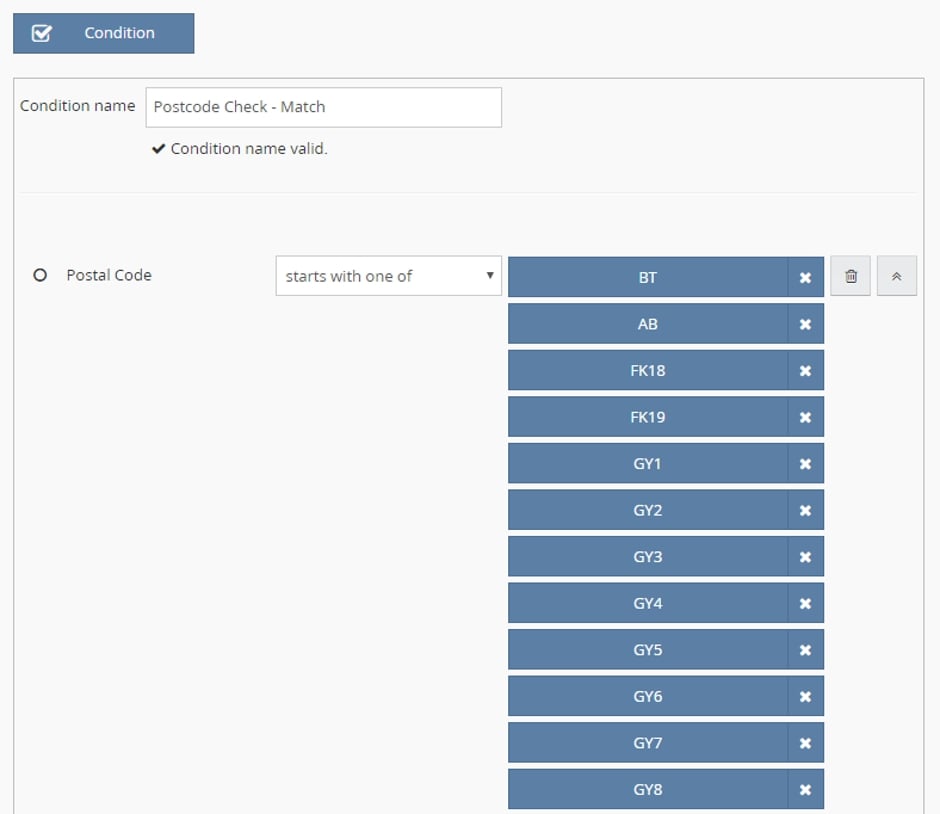
This check finds the restricted postcode and allows you to set another courier service that can fulfill these postcode restrictions.
Now, when we set up restricted postcodes that match we also need to create another condition to check the ones that aren’t restricted postcodes so they can pass through the postcode check to our originally intended services.
This needs to be set up using the same postal code condition with a parameter of “doesn’t start with any of”.

Now parcels are being checked for their domestic address and a courier that can fulfill these orders within the required time frame are applied as the end action services.
That’s it.