Many experienced and amateur online sellers struggle to create professional-looking eBay listings. This article will cover how to create custom eBay templates with subscription services, professional design firms and free online tools, whichever your budget can accommodate.
A customised eBay listing template can help you be more successful on eBay because it can make your listings more attractive to buyers. A professional-looking listing template that’s easy to customise is a useful tool for most sellers. It’s well known that having a strong brand identity is a significant factor in gaining a customer’s trust.
eBay is a competitive marketplace, so your listings must stand out among your competitors. This is one of the cheapest and easiest ways to differentiate yourself from the rest.
Using Pay Monthly Services for Templates
Now there are many of these services out there; they all follow a similar formula of starting with a free trial and then charging you a small, scalable amount per month dependant on the number of items you’re listing. One of the most popular ones is inkFrog.
![]()
There are quite a few reasons why paying out for a subscription for these services can be a good choice for an eBay seller:
- Using templates helps to create trust between buyer and seller because templates can help build your brand identity.
- They allow you to quickly and transparently layout your policies. This creates confidence and credibility when a buyer considers purchasing from you.
- Using a template service saves you time since you can quickly and easily create one or more templates.
- You can also bulk assign your templates to your eBay listings and bulk revise templates across thousands of listings at once, which is an enormous timesaver.
To begin creating your first template design on inkFrog, select templates, then choose ‘Create a new template’. You’re presented with two options:
- I want to make one with inkFrog’s amazing designer.
- I want to use my own custom HTML.
Let’s select the first option to choose from a pre-designed template, don’t worry, you can change it after selecting. If you want to use the pre-designed template as is, select the ‘Save’ button to enter a name for the template, and you’re able to apply it to your listings. If you’d rather do some customising, the options are available in settings: the gear button at the top left of the screen.
The first option offers the ability to upload your logo or a banner image, perfect for branding and creating confidence in your potential buyers. Select the ‘choose upload image’ button to select your file. After adding your image, set the alignment: left, centre, or right and choose the background colour and padding value. If you would like to select a new image, select the ‘X’ button to remove or change it.
Next, we have page backgrounds. You’re able to choose a background colour or upload a new image for the background if desired. You can also change your title font, colour, style, size, content font settings, and link colour.
eBay will always show your photos at the top left of each listing page; you may also choose to include pictures within your template in the description area of your listings. The options available on the inkFrog templates are stacked or none.
![]()
The next navigational button lets you start over and choose a new pre-designed template. If you would like to add a text area, for example, to add details that will remain the same throughout your listings, select the ‘A’ button; this will add a text area with an editor to add any additional details to your listings.
Once you’ve entered that information, select apply changes. If you hover over the text area afterwards, you’re able to move the text area by dragging and dropping it, edit the content of the text area, or delete it.
![]()
The following selection offers the option to add tabbed groups of information. Select the button, and within the pop-up, enter the titles for your tab groups, then select save. Once your tabs are created, click to edit the content for each one.
The final button will save your template. So go ahead and enter a name for your design and select save.
If you’d like to use a custom design instead, go back to templates, select ‘Create a new template’ and choose ‘I want to use my own custom HTML’. There are three choices available: preview, save or exit.
InkFrog provides sample code for the available tags, which include title, description and images. If you’re familiar with programming or have hired a designer, you can enter the code in this section and click ‘Save’ to apply your new template design to your listings. Next, click on listings, then library and tick the checkboxes for the listings that you would like to use the template on. Then select bulk actions, listing actions, assigned template. Choose the name of your template and click apply. That then will go into a queue to process, and once complete; you’ll see your new design on the selected eBay listings.
You’re able to bulk revise your listings at any time simply by updating the latest template. The changes you’ve made will automatically update all of the listings linked to your template within inkFrog. That’s all there is to it, with a subscription service such as this.
Hiring a Designer/Design Firm
Maybe you are considering hiring a professional to custom design your eBay listing template? Perhaps you want to work with a design firm, and you don’t understand how the client-designer relationship works? Many design firms specialise in custom eBay listing design.
So the first thing that you want to do before you hire a designer is obviously research, research, and research some more. I say this because when you as a client are looking for a designer, it’s wise for you to make sure that the person you’re looking to work with is within your price range, so you want to find out what that rate looks like.
You also want to find out if the type of work they do is similar to the style you’re looking for. There are many designers out there, but a lot of the time, you can tell whose style will fit the most just by looking at their previous work. You want to make sure that you research to figure out who goes with your style and what you want to present.
Define what matters most to you before you hire them:
- Do you know what kind of buyers you want to attract?
- Do you know who your audience is?
- Do you know what your goals and your priorities are?
If the answer is no, then maybe you don’t need to hire a designer right now. You probably need to focus on brand strategy before you try to do the visual aspect. A common issue that designers will run into is clients who aren’t specific about what they want and what their needs are. So there may end up being a lot of revisions (and they’ll charge you for them). Ultimately, it will cost both of you time and money, so it’s always best to have an idea of your priorities and goals before deciding to move forward.
You also have to have your content ready. Many people have the misconception that designers are also copywriters or any role other than designers. Whilst they sometimes offer those services, that’s usually an entirely separate service that you’ll have to pay extra for. Often, clients don’t realise that it is their responsibility to ensure that their content is ready so that the designers can do their jobs properly.
It’s your job to know what you want and your expectations before bringing it to someone else, so it’s essential to get all of that in place before you get started.
![]()
How To Create an eBay HTML Listing Template for Free
Next, we’ll cover what you can do to create a professional-looking listing template if a monthly payment option or professional designer isn’t right for you. So, as you probably already know, when you’re creating your eBay listings, you can use the standard option, which is just plain text or use the HTML feature. However, if you don’t know HTML, it will be virtually impossible to use that section.
That’s where free template generators come in; I want to introduce you to a website called Sellercore. Sellercore is free to use; you can either register for an account or just get started with no need to sign up.
![]()
So when you first select Sellercore’s eBay Template HTML Editor, you will see a HTML template. As you can see, it looks professional; you’ve got text sections and images. If you wanted to change an image, all you have to do is double click it.
However, inserting an image is not quite as straightforward as it may seem; because you’re going to need an image URL. If you’re using images from a search engine, just right-click on the image and select copy image URL. You’d then go back to Sellercore, and where it asks you to input your image URL, you’d paste it in there. Once you click ‘Okay’, you’ll see that your image appears in your text. If you wanted to use an image from your computer, you would have to upload your pictures to a site like Imgur. Imgur allows you to get an image URL from images that are not currently on the internet.
![]()
Now you know how to embed an image, you’re going to want to know how to feature videos. Currently, you’re in the design tab, so when you click on ‘guest welcome’, that’s where you’re editing, and now if you click on HTML, it’s going to take you to the HTML version, and that’s where you need to put the embed code for your video.
If you’re unfamiliar with HTML, to make it easy for yourself, you can decide where you want to put the video and then put a row of X’s where you’d like to insert it; this can act as a sort of place marker so that you’re not too overwhelmed with all of the code whilst you’re trying to find your place.
If the video you want is online, you’d go to where it says ‘share’ and then find where it says embed, click on that and copy that code. Next, you would come back to where you have all of those X’s and paste it. If you go back to the design tab, you’ll see that your video is now there, and you can remove those X’s because you don’t need them anymore.
![]()
Now, if you click a new tab, we’re going to cover how to custom design your HTML with Sellercore’s tools. Go to file, and where it says ‘open template file’, click that, and you’ll see a list. Click on the ‘Free’ folder and then select any relevant folder for what you’re selling.

You can have a browse around and see what they have. They have all kinds of themes, from cars to Christmas decorations. You can go ahead and edit any of them just the way you would with Microsoft Word.
![]()
It gives you a lot more options then the standard eBay template gives you. When you’re happy with your design, and you’re satisfied with how it looks. Click ‘HTML’, and then copy the HTML code. Now you probably want to save this because you’ve spent some time creating it. To ensure that the code remains unchanged, save it as a simple Notepad file on a Windows computer or a TextEdit file on a Mac.
Now, when you create a new eBay listing, you can select the HTML tab and paste your HTML from Sellercore in there. When you click on standard view and look at it, you’ll see it’s not just your average eBay listing anymore; it’s now well designed, and it’s a lot more attractive. It’s ready for customers to see it and see that your eBay listing is different from most of the others.
![]()
Another Way To Create Professional Looking eBay Listings for Free
Next, I will cover another great way to create a template for your eBay listings that you don’t have to pay for. To hopefully make you more money online and sell your items quicker. So, if Sellercore was a little too complicated, this could be the option for you.
- Title builder: https://title-builder.com/title-builder/
- WYSIWIG: https://online-toolz.com/tools/html-editor-wysiwyg.php
- Imgur: https://imgur.com/
- Templates: http://www.free-ebay-templates.co.uk/
- Colour Picker: https://www.w3schools.com/tags/ref_colornames.asp
These are the sites that you will be using. We’re going to use the title builder all the way down to the colour picker, they’re all beneficial, and they don’t cost you anything; everything’s free.
We’ve got a title builder to optimise your listing title, a free WYSIWYG online HTML editor (don’t worry, you don’t have to know anything about coding; this is very simple). Imgur for uploading our photos and, of course, the free eBay templates. I’m going to cover how you can manipulate the code just a little bit to make it your own. A colour picker is a handy tool that shows you all of the HEX colour codes for your border’s colour so you can change the frame anytime you want to, and we’ll cover how to do that as well.
Alright, so head to the free eBay templates website and choose a template. I like the red template because it’s been found that people tend to engage more with red. So what you want to do is open up your chosen template in a new tab.
![]()
Now on your desktop, all you’re going to do is right-click and go to ‘view page source’. Don’t worry about whether you understand the code or not; just highlight all of it and click copy. Next, open Notepad and paste it into your Notepad file. You can now minimise that and leave it for later, and you can close the free eBay templates tab because you don’t need it anymore.
Now visit the colour picker website, and you’ll see that it gives you a vast range of colours to choose from if you want to pick a different colour to put around the border.
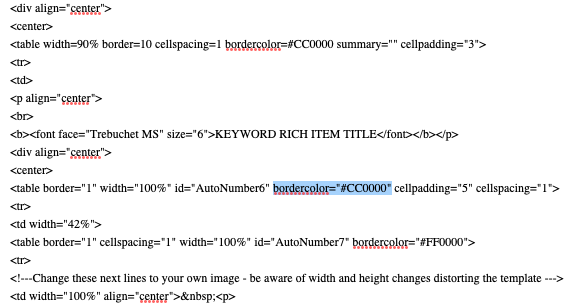
So if you look at the eBay template code and scroll to the very top, the place where you need to put the HEX colour code is right where it says border colour, so you would just change that number to one of the HEX codes. You can choose whatever number colour you like to match your product or item.
This is a great template to use on items that you sell for more than £30 or so, things you want to sell quickly. If it’s something you’re selling for less than that, you’re probably best just using eBay’s non-HTML basic description editor.
Next, we’ll go to the title builder website, which will help you build titles that rank better in eBay search results. It will give you a title with more relevant words for your item that you may not have even thought of. For example, let’s say I’m selling a Nikon D5300 camera. I’d input Nikon D5300 into the title builder, select the country I’m selling in and click return.
The title builder site suggests that instead of just listing my camera as ‘Nikon D5300’. I should use the title ‘Nikon D5300 Camera Digital 24 SLR 18 Lens Body 2 55mm MP DSLR Black Only AF Kit 2mp S VR’. So you can see that their suggestion encourages you to use all of the characters available and use relevant keywords. This way, you’re more likely to appear in a potential buyer’s search results.
Next, visit the online WYSIWYG HTML editor. Pull up that free eBay template code, copy it and then click the HTML button under ‘font family’. Another box will pop up, then just right-click and paste in that code, hit update, and it appears!

Now, you won’t be able to see your border colour here just yet, but don’t worry, it will show up once we copy this code to the HTML tab on eBay.
Next, you want to update your description and policy terms. You can edit this just like you would edit a Microsoft Word document; it’s quick and easy and shouldn’t take long at all.
Next, visit Imgur, and upload your product photos. Once you’re done, get the URL link of these images, head back over to your template and use the WYSIWYG editor. There’s a small tree icon under the font family drop-down menu; click on that to insert/edit your images.
Once you’re done tweaking your template, click on HTML again, right-click to copy and then paste this into Notepad. You can delete the original one from earlier because we’ve got our new and improved version now. Save this to somewhere on your computer, and then you’ll always have a great looking, ready to use template.
When you want to use it again, all you have to do is copy the code, pop it into the WYSIWYG editor and change your title, text and pictures. That’s all you have to do next time. You’ll very quickly be able to list on eBay with a professional-looking template because you’re going to have that template saved to your computer so that it can be very efficient for you.
Next time you want to use your template on eBay, take the code that you just made (make sure you’re on the HTML tab when you’re creating a listing) and paste it in. Go over to the standard tab, and you’ll see that you have a professional-looking template for your listing.
You can start creating appealing eBay listings quickly once you have the code because you’ll just be listing your item, popping in your images and setting your price. You’ll be on your way to having professional listings in less than 10 minutes.
![]()
How To Create a Custom Template To List Quickly on eBay
Next, we’re going to look at eBay’s listing template feature and why you should have listing templates set up to help you save more time and make more money.
Now, this is different from what we’ve already covered because this isn’t about HTML. This is about creating a template for your items prefilled with the things that aren’t likely to change. Such as your shipping policy, returns policy and business address. The benefits of setting these up are the amount of time you can save.
First, head to ‘create listing’, and you’re going to see that eBay asks you what you’re selling, but that’s not what we’re going to fill in. Today, we’re going to go down to where it says ‘create new template’ because we will create one together.
So this is almost mandatory for certain sellers, especially clothing resellers. If you’re bulk selling items, you need this, especially if they’re similar and in similar categories; this will save you so much time.
Template Name: Let’s just say this will be our test template; now, the title doesn’t matter because obviously, it depends very much on what you’re selling.
Bold title in search results: Don’t select this; it isn’t necessary and costs extra.
Subtitle: Again, do not add anything there; it will cost you money, and it’s unnecessary.
Custom Label: This is important if you already have a stock-keeping system in place; you’d type the code in here.
Category Section: Now, whatever you type in here, the category will adapt to predict the category, eBay will populate the most accurate category there for you. You could be changing this for every listing, so it doesn’t matter what you select right now.
Second category: This, again, is unnecessary. If a buyer is going to find your items, they’re most likely not going to see them through categories; they’ll find them through keywords.
Store Categories: If you have an eBay store, this is for you. If you don’t, don’t worry about it; people don’t tend to shop by eBay stores anyway; again, they mostly use the site’s search feature.
Variations: If you’re selling the same item in different colours or sizes, you can create the variations of your item here.
UPC: If your item has a barcode, enter it here.
Condition: Select what condition your items are in.
Condition Description: Some sellers fill this in; others don’t. If you’re selling used items, then it’s best to be very clear about the article’s condition, and you can use this space for that.
Photos: Self-explanatory; add your product photography photos here.
Gallery Plus: Again, it is unnecessary. In fact, pretty much anything that eBay wants you to add that costs extra is superfluous.
Item Specifics: Once you put in the title and select a category, eBay will help you auto-populate this. eBay’s algorithm is pretty good; sometimes, you’ll have to go in and change a couple of things, but it works well for the most part.
What you’re doing right now is just setting up the framework to make things a little easier. At the moment, we haven’t made things faster, but this next part will.
Item Description: Now, this is where you can save yourself some time. For example, if you’re a clothing reseller, buyers have to see the measurements, right? You can put the generic sections for those measurements so that they appear ready to fill out for each listing. So just a few seconds of typing can make the process faster; it’s those little seconds that count. Instead of you typing out the same thing for thousands of listings a year, you have it saved already.
Selling Details: Again, this is something specific to your business, and you can use it to save you time.
Quantity: Just keep it as one; if you have multiples, you can change that later.
Shipping Details: This is another place where you could save time by typing out your shipping terms. These little things just make it so much more streamlined when everything comes together. Same with the return policy; if you accept returns, just mark it on all your listings, and it’s done; it’s just there, and there are no other buttons you have to click.
![]()
It’s hard to believe, but making these minor one-second clicks can add up to a significant amount of time. Even just by setting these simple policies, you’ve saved yourself about 10 seconds, and if you’re doing a thousand listings a year, that adds up.
That’s why ecommerce managed services are becoming so popular for sellers. These services use software like Linnworks; Linnworks is an automated eCommerce system that helps sellers automate critical processes. It fully automates order and inventory management, shipping tasks, listings and much more. You can use eBay HTML and list via Linnworks too.
So when you think about it on that level, it’s essential to do whatever you can to streamline your business. Whether it’s using eBay templates, ecommerce managed services or a spreadsheet method to transfer information quickly. Do whatever you can to save time because that is how you ultimately make more money, and that’s how you grow as a business.